WPFのグラデーション
一つ前の記事と同じようにグラデーションについてもメモ
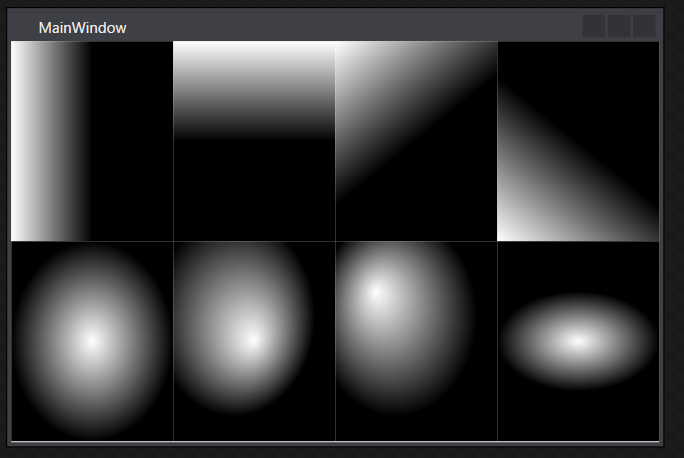
<Window x:Class="WpfApp1.MainWindow"
        xmlns="http://schemas.microsoft.com/winfx/2006/xaml/presentation"
        xmlns:x="http://schemas.microsoft.com/winfx/2006/xaml"
        xmlns:d="http://schemas.microsoft.com/expression/blend/2008"
        xmlns:mc="http://schemas.openxmlformats.org/markup-compatibility/2006"
        xmlns:local="clr-namespace:WpfApp1"
        mc:Ignorable="d"
        Title="MainWindow" Height="350" Width="525">
    <UniformGrid
        Rows="2"
        Columns="4"
        >
        <Canvas>
            <Canvas.Background>
                <LinearGradientBrush StartPoint="0,1" EndPoint="1,1">
                    <GradientStop Color="White" Offset="0"/>
                    <GradientStop Color="Black" Offset="0.5"/>
                </LinearGradientBrush>
            </Canvas.Background>
        </Canvas>
        <Canvas>
            <Canvas.Background>
                <LinearGradientBrush StartPoint="0,0" EndPoint="0,1">
                    <GradientStop Color="White" Offset="0"/>
                    <GradientStop Color="Black" Offset="0.5"/>
                </LinearGradientBrush>
            </Canvas.Background>
        </Canvas>
        <Canvas>
            <Canvas.Background>
                <LinearGradientBrush StartPoint="0,0" EndPoint="1,1">
                    <GradientStop Color="White" Offset="0"/>
                    <GradientStop Color="Black" Offset="0.5"/>
                </LinearGradientBrush>
            </Canvas.Background>
        </Canvas>
        <Canvas>
            <Canvas.Background>
                <LinearGradientBrush StartPoint="0,1" EndPoint="1,0">
                    <GradientStop Color="White" Offset="0"/>
                    <GradientStop Color="Black" Offset="0.5"/>
                </LinearGradientBrush>
            </Canvas.Background>
        </Canvas>
        <Canvas>
            <Canvas.Background>
                <RadialGradientBrush RadiusX="1" RadiusY="1" Center="0.5,0.5" GradientOrigin="0.5,0.5">
                    <GradientStop Color="White" Offset="0"/>
                    <GradientStop Color="Black" Offset="0.5"/>
                </RadialGradientBrush>
            </Canvas.Background>
        </Canvas>
        <Canvas>
            <Canvas.Background>
                <RadialGradientBrush RadiusX="1" RadiusY="1" Center="0.25,0.25" GradientOrigin="0.5,0.5">
                    <GradientStop Color="White" Offset="0"/>
                    <GradientStop Color="Black" Offset="0.5"/>
                </RadialGradientBrush>
            </Canvas.Background>
        </Canvas>
        <Canvas>
            <Canvas.Background>
                <RadialGradientBrush RadiusX="1" RadiusY="1" Center="0.5,0.5" GradientOrigin="0.25,0.25">
                    <GradientStop Color="White" Offset="0"/>
                    <GradientStop Color="Black" Offset="0.5"/>
                </RadialGradientBrush>
            </Canvas.Background>
        </Canvas>
        <Canvas>
            <Canvas.Background>
                <RadialGradientBrush RadiusX="1" RadiusY="0.5" Center="0.5,0.5" GradientOrigin="0.5,0.5">
                    <GradientStop Color="White" Offset="0"/>
                    <GradientStop Color="Black" Offset="0.5"/>
                </RadialGradientBrush>
            </Canvas.Background>
        </Canvas>
    </UniformGrid>
</Window>
WPFの描画関係メモ
描画関係、仕事では滅多に使わないのだけど、
その分毎回忘れてしまうのでこの記事でメモ
とにかく線を引いてみる
Lineクラスをそのまま使うことも出来るけど、
多少込み入った描画方法も習得したいならPathを覚えた方が良さそう。
(その分重いみたいだが・・・)
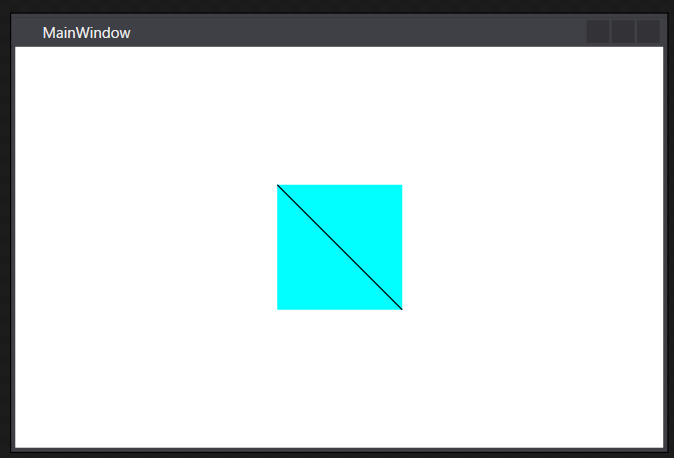
<Window x:Class="WpfApp1.MainWindow"
        xmlns="http://schemas.microsoft.com/winfx/2006/xaml/presentation"
        xmlns:x="http://schemas.microsoft.com/winfx/2006/xaml"
        xmlns:d="http://schemas.microsoft.com/expression/blend/2008"
        xmlns:mc="http://schemas.openxmlformats.org/markup-compatibility/2006"
        xmlns:local="clr-namespace:WpfApp1"
        mc:Ignorable="d"
        Title="MainWindow" Height="350" Width="525">
    <Canvas
        Height="100"
        Width="100"
        Background="Aqua"
        >
        <Path
            Stroke="Black"
            >
            <Path.Data>
                <LineGeometry
                    StartPoint="0,0"
                    EndPoint="100,100"
                    />
            </Path.Data>
        </Path>
    </Canvas>
</Window>
複数の線を引く
GeometryGroupの中に描画したいGeometryを追加して行けば良い。
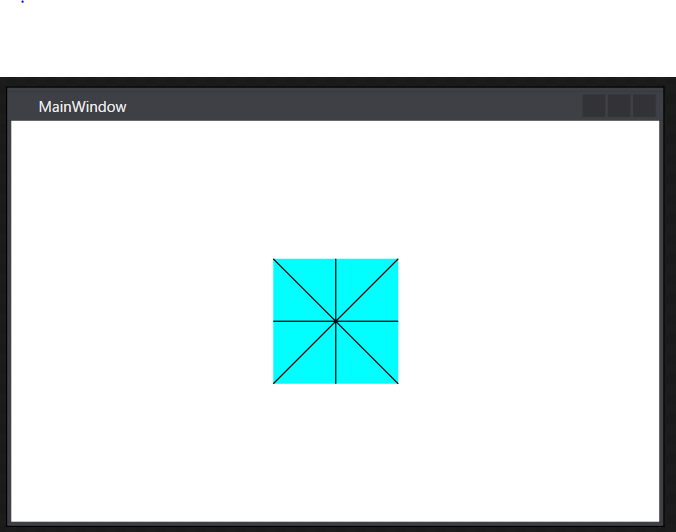
<Window x:Class="WpfApp1.MainWindow"
        xmlns="http://schemas.microsoft.com/winfx/2006/xaml/presentation"
        xmlns:x="http://schemas.microsoft.com/winfx/2006/xaml"
        xmlns:d="http://schemas.microsoft.com/expression/blend/2008"
        xmlns:mc="http://schemas.openxmlformats.org/markup-compatibility/2006"
        xmlns:local="clr-namespace:WpfApp1"
        mc:Ignorable="d"
        Title="MainWindow" Height="350" Width="525">
    <Canvas
        Height="100"
        Width="100"
        Background="Aqua"
        >
        <Path
            Stroke="Black"
            >
            <Path.Data>
                <GeometryGroup>
                    <LineGeometry
                        StartPoint="0,0"
                        EndPoint="100,100"
                        />
                    <LineGeometry
                        StartPoint="100,0"
                        EndPoint="0,100"
                        />
                    <LineGeometry
                        StartPoint="50,0"
                        EndPoint="50,100"
                        />
                    <LineGeometry
                        StartPoint="0,50"
                        EndPoint="100,50"
                        />
                </GeometryGroup>
            </Path.Data>
        </Path>
    </Canvas>
</Window>
円・楕円
円、楕円は中心の座標とX軸の半径、Y軸の半径を指定する。
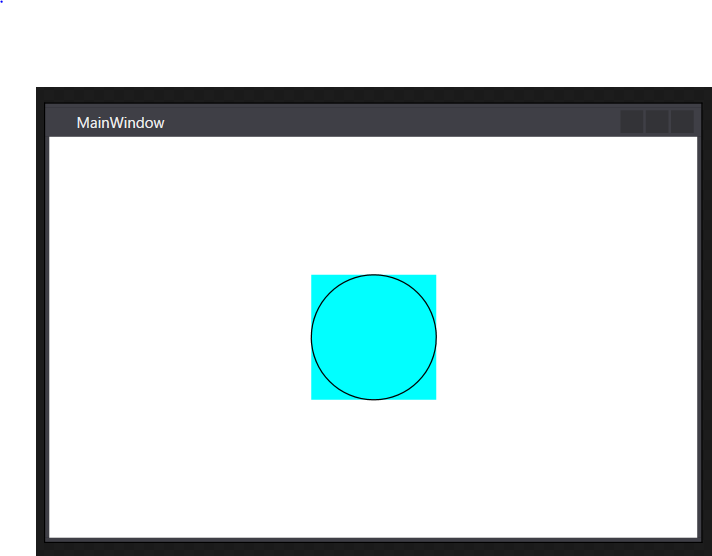
<Window x:Class="WpfApp1.MainWindow"
        xmlns="http://schemas.microsoft.com/winfx/2006/xaml/presentation"
        xmlns:x="http://schemas.microsoft.com/winfx/2006/xaml"
        xmlns:d="http://schemas.microsoft.com/expression/blend/2008"
        xmlns:mc="http://schemas.openxmlformats.org/markup-compatibility/2006"
        xmlns:local="clr-namespace:WpfApp1"
        mc:Ignorable="d"
        Title="MainWindow" Height="350" Width="525">
    <Canvas
        Height="100"
        Width="100"
        Background="Aqua"
        >
        <Path
            Stroke="Black"
            >
            <Path.Data>
                <EllipseGeometry
                    Center="50,50"
                    RadiusX="50"
                    RadiusY="50"
                    />
            </Path.Data>
        </Path>
    </Canvas>
</Window>
四角形
四角形はRectプロパティにX軸の始点、Y軸の始点、X軸の幅、Y軸の幅を指定する。

<Window x:Class="WpfApp1.MainWindow"
        xmlns="http://schemas.microsoft.com/winfx/2006/xaml/presentation"
        xmlns:x="http://schemas.microsoft.com/winfx/2006/xaml"
        xmlns:d="http://schemas.microsoft.com/expression/blend/2008"
        xmlns:mc="http://schemas.openxmlformats.org/markup-compatibility/2006"
        xmlns:local="clr-namespace:WpfApp1"
        mc:Ignorable="d"
        Title="MainWindow" Height="350" Width="525">
    <Canvas
        Height="100"
        Width="100"
        Background="Aqua"
        >
        <Path
            Stroke="Black"
            >
            <Path.Data>
                <RectangleGeometry
                    Rect="20,20,60,60"
                    />
            </Path.Data>
        </Path>
    </Canvas>
</Window>
塗りつぶし
PathクラスのFillプロパティにブラシを指定することで塗りつぶし
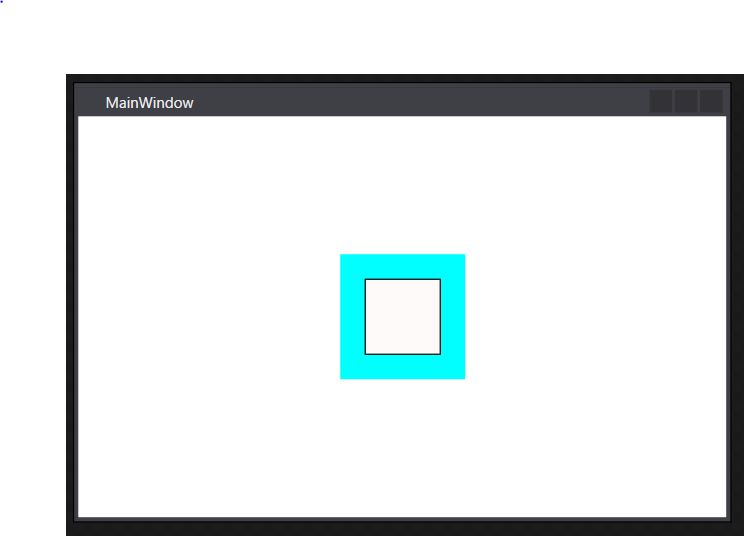
<Window x:Class="WpfApp1.MainWindow"
        xmlns="http://schemas.microsoft.com/winfx/2006/xaml/presentation"
        xmlns:x="http://schemas.microsoft.com/winfx/2006/xaml"
        xmlns:d="http://schemas.microsoft.com/expression/blend/2008"
        xmlns:mc="http://schemas.openxmlformats.org/markup-compatibility/2006"
        xmlns:local="clr-namespace:WpfApp1"
        mc:Ignorable="d"
        Title="MainWindow" Height="350" Width="525">
    <Canvas
        Height="100"
        Width="100"
        Background="Aqua"
        >
        <Path
            Stroke="Black"
            Fill="Snow"
            >
            <Path.Data>
                <RectangleGeometry
                    Rect="20,20,60,60"
                    />
            </Path.Data>
        </Path>
    </Canvas>
</Window>
交差部分の塗りつぶし
GeometryGroupのFillRuleプロパティによって交差する図形の描画方法が変わる。
GeometryGroup.FillRule プロパティ (System.Windows.Media)
↑ぱっと読んだだけでは理解出来ず・・・
EvenOdd⇒交差する部分を塗りつぶししない?
NonZero⇒交差する部分を塗りつぶす?
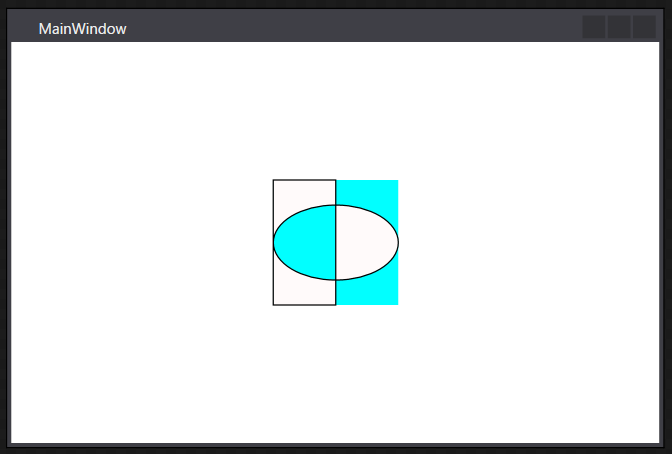
<Window x:Class="WpfApp1.MainWindow"
        xmlns="http://schemas.microsoft.com/winfx/2006/xaml/presentation"
        xmlns:x="http://schemas.microsoft.com/winfx/2006/xaml"
        xmlns:d="http://schemas.microsoft.com/expression/blend/2008"
        xmlns:mc="http://schemas.openxmlformats.org/markup-compatibility/2006"
        xmlns:local="clr-namespace:WpfApp1"
        mc:Ignorable="d"
        Title="MainWindow" Height="350" Width="525">
    <Canvas
        Height="100"
        Width="100"
        Background="Aqua"
        >
        <Path
            Stroke="Black"
            Fill="Snow"
            >
            <Path.Data>
                <GeometryGroup FillRule="EvenOdd">
                    <RectangleGeometry
                        Rect="0,0,50,100"
                        />
                    <EllipseGeometry
                        Center="50,50"
                        RadiusX="50"
                        RadiusY="30"
                        />
                </GeometryGroup>
            </Path.Data>
        </Path>
    </Canvas>
</Window>
交差部分の塗りつぶし(CombinedGeometry)
CombinedGeometryを使うと交差部分の扱いがもう少し理解しやすい。
WPFでプログラムしてみよう(6) - 子持ちししゃもといっしょ
参考にさせていただくと、
CombinedGeometryはGeometry1とGeometry2の二つの要素の合成であり、
GeometryCombineModeで交差部分の処理を切り替えることが出来る様子。
Exclude⇒Geometry1からGeometry2の交差部分を除いた領域を描画
Intersect⇒交差部分のみ描画
Union⇒全ての領域を描画
Xor⇒交差部分以外を描画
さっきと同じ結果だが、CombinedGeometryで書き換えると以下のようになる

<Window x:Class="WpfApp1.MainWindow"
        xmlns="http://schemas.microsoft.com/winfx/2006/xaml/presentation"
        xmlns:x="http://schemas.microsoft.com/winfx/2006/xaml"
        xmlns:d="http://schemas.microsoft.com/expression/blend/2008"
        xmlns:mc="http://schemas.openxmlformats.org/markup-compatibility/2006"
        xmlns:local="clr-namespace:WpfApp1"
        mc:Ignorable="d"
        Title="MainWindow" Height="350" Width="525">
    <Canvas
        Height="100"
        Width="100"
        Background="Aqua"
        >
        <Path
            Stroke="Black"
            Fill="Snow"
            >
            <Path.Data>
                <CombinedGeometry
                    GeometryCombineMode="Xor"
                    >
                    <CombinedGeometry.Geometry1>
                        <RectangleGeometry
                            Rect="0,0,50,100"
                            />
                    </CombinedGeometry.Geometry1>
                    <CombinedGeometry.Geometry2>
                        <EllipseGeometry
                            Center="50,50"
                            RadiusX="50"
                            RadiusY="30"
                            />
                    </CombinedGeometry.Geometry2>
                </CombinedGeometry>
            </Path.Data>
        </Path>
    </Canvas>
</Window>
C# WPF PreviewTextInputで入力後のテキストを取得する。
とりあえずコード
        private static void TextBox_PreviewTextInput(object sender, TextCompositionEventArgs e)
        {
            var textBox = sender as TextBox;
            if (textBox == null) return;

            var changed =
                textBox.Text
                .Remove(textBox.SelectionStart, textBox.SelectionLength)
                .Insert(textBox.SelectionStart, e.Text)
                ;
        }
・テキストボックスの選択範囲の文字列を消す。(Removeメソッドの部分)
・イベント引数から入力された文字列(e.Text)を選択位置に挿入する。(Insertメソッドの部分)
※自作ビヘイビアからの抜粋なのでメソッドはprivate static
注意しなければいけないこと
これだけで万事解決出来れば良いのだけど他にも気を付けなければいけないことある。
ペーストへの対応
DataObjectPastingイベントのハンドラーを使ってペースト時にチェックを処理を差し込んでやる必要がある。
イベントハンドラーの購読はDataObjectクラスのAddPastingHandlerメソッド、
購読の解除はDataObjectクラスのRemovePastingHandlerメソッドを使う。
DataObjectPastingイベントの購読と購読解除の例
            // 購読開始
            DataObject.AddPastingHandler(textBox, OnPasting);
            // 購読解除
            DataObject.RemovePastingHandler(textBox, OnPasting);
先のPreviewTextInputの時と同じようにペーストした後のテキストを取得するなら以下のような具合になる。
        private static void DataObject_Pasting(object sender, DataObjectPastingEventArgs e)
        {
            var textBox = sender as TextBox;
            if (textBox == null) return;

            var pasted = e.SourceDataObject.GetData(DataFormats.UnicodeText) as string;
            if (pasted == null) return;

            var changed =
                textBox.Text
                .Remove(textBox.SelectionStart, textBox.SelectionLength)
                .Insert(textBox.SelectionStart, pasted)
                ;
        }
IMEへの対応
WPFではIMEの入力途中であってもTextChangedイベントが発生する。半角文字の入力に限定したコントロールであれば、
フォーカス中にIMEを無効化すれば良いが、全角入力を受け付ける場合は注意が必要。
Textプロパティへの書き込み
コード側でTextBoxのTextプロパティを書き換えられた場合、これはTextChangedイベントで検出する必要がある。全てのチェックをTextChangedイベントで完結させることも出来るが、キャレットの復元やテキストの復元まで考慮すると複雑なロジックになってしまいがち。また、MVVMで開発している場合、ViewModelとの余計な通信が発生する原因にもなるので役割を分担して対応したいところ。
C# 正規表現の基礎をメモ
Regexクラス
・C#で正規表現を使う場合はRegexを使う。
・コンストラクタでパターン文字列を指定する。
・IsMatch(String)メソッド(戻り値bool)で正規表現と一致するかどうかを取得する。
使用例
以下簡単な使用例、行頭、行末、繰り返しを組み合わせれば業務アプリの入力チェックを簡素に記述出来ると思われる。
よく見かけるのは銀行系の利用可能文字、電話番号、郵便番号、金額や単価、数量とかかな。
            // 空文字または半角英数字のみ
            Assert.IsTrue(new Regex("^[a-zA-Z0-9]*$").IsMatch(string.Empty));
            Assert.IsTrue(new Regex("^[a-zA-Z0-9]*$").IsMatch("azAZ09"));

            Assert.IsFalse(new Regex("^[a-zA-Z0-9]*$").IsMatch("azAZ09あ"));
            Assert.IsFalse(new Regex("^[a-zA-Z0-9]*$").IsMatch("a-0"));

            // 3桁半角英数字のみ
            Assert.IsTrue(new Regex("^[a-zA-Z0-9]{3}$").IsMatch("A12"));
            Assert.IsTrue(new Regex("^[a-zA-Z0-9]{3}$").IsMatch("9ab"));

            Assert.IsFalse(new Regex("^[a-zA-Z0-9]{3}$").IsMatch("dz"));
            Assert.IsFalse(new Regex("^[a-zA-Z0-9]{3}$").IsMatch("9abc"));

            // 3桁以下半角英数字のみ
            Assert.IsTrue(new Regex("^[a-zA-Z0-9]{0,3}$").IsMatch(string.Empty));
            Assert.IsTrue(new Regex("^[a-zA-Z0-9]{0,3}$").IsMatch("9ab"));
            Assert.IsTrue(new Regex("^[a-zA-Z0-9]{0,3}$").IsMatch("Aa"));

            Assert.IsFalse(new Regex("^[a-zA-Z0-9]{0,3}$").IsMatch("9abc"));
            Assert.IsFalse(new Regex("^[a-zA-Z0-9]{0,3}$").IsMatch("9abc"));
WPF 主要コントロールのMSDNリンク
UIElement クラス (System.Windows)
FrameworkElement クラス (System.Windows)
TextBox クラス (System.Windows.Controls)
Label クラス (System.Windows.Controls)
TextBlock クラス (System.Windows.Controls)
UserControl クラス (System.Windows.Controls)
Button クラス (System.Windows.Controls)
GroupBox クラス (System.Windows.Controls)
Selector クラス (System.Windows.Controls.Primitives)
ToggleButton クラス (System.Windows.Controls.Primitives)
プログラミングで見かける英単語メモ
Application アプリケーション
Run 走る
Execute 実行
Commit コミット
RollBack ロールバック
Save 保存
Load 読み込み
Store 保存
Restore 復元
Register 登録
Repository 貯蔵庫
Cancel 取り消し
Repeat 繰り返し
Receive 受け取る
Throw 投げる
Ignore 無視する
Reverse
Clear
Add
Append
Remove
Contains
Shutdown シャットダウン
Find
FindAll
Search 検索
Criteria 基準
Continue 継続する
Initialize 初期化する
Assert 表明する
Build
Output 出力
Input 入力
Show
Display
Open 開く
Close 閉じる
Fail 失敗する
Hide 隠す
Format 整える
Initial 当初の
Default 既定の
Entry 入場する
Edit 編集する
Change 変える
Redo やり直す
Undo 元通りにする
Notify 通知する
Handle 操作する
Perfome (仕事や任務を)行う/する
Commma カンマ
Colon コロン
Dot ドット
Slash スラッシュ
Separator 区切り文字
One 一方
Other 他方
Pair ペア
Tuple 複数の要素からなる組み合わせ
Query 問い合わせ
Single 単一の
Multi 複数の
Apply 適用する
Activate 活性化する
Inactivate 不活性化する
Activity 活動
Content 内容
Context 文脈
Wide 広い
Narrow 狭い
Upper 上部の
Lower 下部の
UpperCase 大文字
LowerCase 小文字
Table
Row
Column
Index
Truncate
Select
Update
Upsert
Merge
Insert
Delete
Result
Return
Premitive
Byte
String
Integer
Long
Decimal
String
DateTime
Size
Point
Type
Charactor 文字
DecimalPlace 小数点
Process 手順/手続き
State 状態
Kind 種類
Decorator
Adapter
Mediator メディエーター/仲介者
Visitor
Visit 訪問する
Aceppt 受け入れる
Error エラー
Warning 警告
Information 情報
Notice お知らせ
Notification 通知
Total 合計
Subtotal 小計
Event 出来事
Publish 発行
Subscribe 申し込む
Unsubscribe 退会
Bank 銀行
Person 個人
Customer 顧客
All 全て
Any 何れか
None 何一つない
Predicate 述語
Specification 仕様
List リスト
Collection コレクション
Array 配列
Empty 空
Matrix 行列
Property プロパティ、所有物
Meghod メソッド
Class クラス
Instance インスタンス
Object
Attribute 属性
Constant
Variable 可変
Mutable 可変なオブジェクト
Immutable 不変なオブジェクト
Array
Solution
Project
Public
Private
Internal
Interface
Implement
Concrete
Static
Dynamic
View
Model
ViewModel
Behaivior
Confirmation 確認
Permit 許可
Reject 拒否
Message メッセージ
Log ログ
Clich クリック
Enter エンター
Leave リーブ
Focus フォーカス
Width 幅
Height 高さ
Location 位置
Left
Top
Interval 間隔
Create 生成
Dispose
File
Directory
Folder
Node
Parent
Child/Children
Forest
Root
Leaf
Top
Bottom
Right
Left
Vertical 垂直
Horizontal 水平
Next
Current
Previous
If
Else
And 論理積
Or 論理和
AndAlso
OrElse
Not 否定
Inverse 反対の
Start
End
Stop
Begin
Period
Range
Date
Time
Year
Month
Day
DayOfWeek
Week
WeekEnd 週末
Ticks
MilliSecond
Meiji
Taisho
Showa
Heisei
Count 件数
Index
Length 長さ
Money 金額
Period 期間
Detail
Subject 件名
Remark 備考
Note 備考
Description 説明
Line 改行
Unit 単位
PhoneNumber 電話番号
Address 住所
Contact 連絡先
Postcode 郵便番号
Code コード
Name 名前
Id ID
Identifer 識別子
Kana カタカナ
Kanji 漢字
Corporation 法人
Company 会社
Group 集団
Member 構成員
Element 要素
Department部署
Position 役職
Branch 枝/支店
Bank 銀行
BankAccount 銀行口座
Transfer 転送
Send 送信/送る
Cost 費用
Profit
Key キー
KeyBoad
Db データベース
UI ユーザーインターフェース
GUI グラフィカルユーザーインターフェース
Theme テーマ
Dictionary 辞書
Style スタイル
Product プロダクト
UnitPrice 単価
Quantity 数量
Price 価格
Tax 税
ConsumptionTax 消費税
Taxin 税込み
Taxout 税抜き
TaxRate 税率
Account 勘定
Accounting 経理
Slip 伝票
Journal 仕訳
Debit 借方/債務
Credit 貸方/債権
Balance 貸借
BalanceSheet 貸借対照表
Rate 率
Percent パーセント
Payment 支払い
User ユーザー
Password パスワード
Setting 環境
Configuration 配置/構成
Login
Logout
Signin
Signout
Author 著者
Sign 署名する
Signature 署名