WPF ボタンのカスタマイズ方法概略
ボタン側のXAML
ボタンのXAML、Buttonクラスを継承して記述、コードビハインドは無し。
VSでユーザーコントロール(WPF)を追加して派生元をUserControlからButtonに変更したものを編集
<Button x:Class="WpfApp1.CustomButton"
             xmlns="http://schemas.microsoft.com/winfx/2006/xaml/presentation"
             xmlns:x="http://schemas.microsoft.com/winfx/2006/xaml"
             xmlns:mc="http://schemas.openxmlformats.org/markup-compatibility/2006"
             xmlns:d="http://schemas.microsoft.com/expression/blend/2008"
             xmlns:local="clr-namespace:WpfApp1"
             mc:Ignorable="d"
             d:DesignHeight="450" d:DesignWidth="800"
             OverridesDefaultStyle="True"
             FocusVisualStyle="{x:Null}"
             >
    <Button.Template>
        <ControlTemplate TargetType="Button">
            <Grid>
                <Border
                    x:Name="ButtonVisual"
                    BorderBrush="DimGray"
                    BorderThickness="2"
                    Background="AliceBlue"
                    >
                    <ContentPresenter
                        HorizontalAlignment="Center"
                        VerticalAlignment="Center"
                        Content="{TemplateBinding Content}"
                        />
                </Border>
                <Border
                    x:Name="MaskOnPressed"
                    Background="Black"
                    Opacity="0.1"
                    Visibility="Hidden"
                    />
            </Grid>
            <ControlTemplate.Triggers>
                <Trigger Property="IsFocused" Value="true">
                    <Setter TargetName="ButtonVisual" Property="BorderBrush" Value="MidnightBlue"/>
                </Trigger>
                <Trigger Property="IsMouseOver" Value="true">
                    <Setter TargetName="ButtonVisual" Property="Background" Value="Lavender"/>
                </Trigger>
                <Trigger Property="IsEnabled" Value="false">
                    <Setter Property="Opacity" Value="0.5"/>
                </Trigger>
                <Trigger Property="IsPressed" Value="true">
                    <Setter TargetName="MaskOnPressed" Property="Visibility" Value="Visible"/>
                </Trigger>
            </ControlTemplate.Triggers>
        </ControlTemplate>
    </Button.Template>
</Button>
画面側のXAML
ボタンを画面に貼っつけたXAML、こちらもコードビハインドなし。
<Window x:Class="WpfApp1.MainWindow"
        xmlns="http://schemas.microsoft.com/winfx/2006/xaml/presentation"
        xmlns:x="http://schemas.microsoft.com/winfx/2006/xaml"
        xmlns:d="http://schemas.microsoft.com/expression/blend/2008"
        xmlns:mc="http://schemas.openxmlformats.org/markup-compatibility/2006"
        xmlns:local="clr-namespace:WpfApp1"
        mc:Ignorable="d"
        Title="MainWindow" Height="450" Width="800">
    <Canvas>
        <local:CustomButton
            Canvas.Left="10"
            Canvas.Top="10"
            Width="100"
            Height="20"
            Content="ボタン1"
            />
        <local:CustomButton
            Canvas.Left="10"
            Canvas.Top="40"
            Width="100"
            Height="20"
            Content="ボタン2"
            />
        <local:CustomButton
            Canvas.Left="10"
            Canvas.Top="70"
            Width="100"
            Height="20"
            Content="ボタン3"
            IsEnabled="False"
            />
    </Canvas>
</Window>
実行時イメージ
上から順に、
フォーカス取得中
フォーカス無しの表示
Disable(IsEnabled=false)の表示

ポイント
標準スタイルの無効化
・OverridesDefaultStyle=”true”で標準のスタイルを読み込まないように
・FocusVisualStyle="{x:Null}"でフォーカス取得時スタイルを初期化
(フォーカス取得時に点線が表示されるやつ。)
トリガーで実現しているもの
・フォーカス時に外枠の色を濃い目に変更
・マウスオーバー時に塗りつぶし色を濃い目に変更
・Disableの時、全体を半透明にして使えないっぽい外観に
・押下時、半透明のフィルタを被せて操作に対するレスポンスを表現
WPF 描画の練習 マル印
前回の記事に引き続き、WPFの描画周りを練習
前回の記事はこちら↓
nomoredeathmarch.hatenablog.com
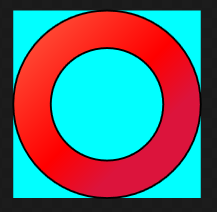
前回はバツ印を作ったので今回はマル印を作ってみました。
まだ簡単・・・
イメージ
XAML
<UserControl x:Class="WpfApp1.UserControl2"
             xmlns="http://schemas.microsoft.com/winfx/2006/xaml/presentation"
             xmlns:x="http://schemas.microsoft.com/winfx/2006/xaml"
             xmlns:mc="http://schemas.openxmlformats.org/markup-compatibility/2006"
             xmlns:d="http://schemas.microsoft.com/expression/blend/2008"
             xmlns:local="clr-namespace:WpfApp1"
             mc:Ignorable="d"
             d:DesignHeight="300" d:DesignWidth="300">
    <Canvas
        Height="100"
        Width="100"
        Background="Aqua"
        >
        <Path
            Stroke="Black"
            >
            <Path.Fill>
                <LinearGradientBrush StartPoint="0,0" EndPoint="1,1">
                    <GradientStop Color="Tomato" Offset="0"/>
                    <GradientStop Color="Red" Offset="0.5"/>
                    <GradientStop Color="Crimson" Offset="0.7"/>
                </LinearGradientBrush>
            </Path.Fill>
            <Path.Data>
                <CombinedGeometry
                    GeometryCombineMode="Xor"
                    >
                    <CombinedGeometry.Geometry1>
                        <EllipseGeometry Center="50,50" RadiusX="50" RadiusY="50"/>
                    </CombinedGeometry.Geometry1>
                    <CombinedGeometry.Geometry2>
                        <EllipseGeometry Center="50,50" RadiusX="30" RadiusY="30"/>
                    </CombinedGeometry.Geometry2>
                </CombinedGeometry>
            </Path.Data>
        </Path>
    </Canvas>
</UserControl>
ポイント
・半径が違う円を重ねて合成
・GeometryCombineModeはXorでGeometry2の領域を描画しない
ジオメトリの使い方、良いサンプルないかなぁってネットで検索したりしてたのですが、
手元にあるエッセンシャルWPFの204ページ辺りにしっかり書いてありました。

エッセンシャルWPF:Windows Presentation Foundation (Programmer's SELECTION)
- 作者: Chris Anderson,星睦
- 出版社/メーカー: 翔泳社
- 発売日: 2007/10/31
- メディア: 大型本
- 購入: 6人 クリック: 128回
- この商品を含むブログ (32件) を見る
WPF 描画の練習 バツ印
描画処理への理解を深めるため、簡単なマークの作成に挑戦してみました。
大したことしてないのに思った以上に「それっぽく」見えるので面白いです。
イメージ

XAML
<UserControl x:Class="WpfApp1.UserControl1"
             xmlns="http://schemas.microsoft.com/winfx/2006/xaml/presentation"
             xmlns:x="http://schemas.microsoft.com/winfx/2006/xaml"
             xmlns:mc="http://schemas.openxmlformats.org/markup-compatibility/2006"
             xmlns:d="http://schemas.microsoft.com/expression/blend/2008"
             xmlns:local="clr-namespace:WpfApp1"
             mc:Ignorable="d"
             d:DesignHeight="300" d:DesignWidth="300">
    <Canvas
        Height="100"
        Width="100"
        Background="Aqua"
        >
        <Path
            Stroke="Black"
            >
            <Path.Fill>
                <LinearGradientBrush StartPoint="0,0" EndPoint="1,1">
                    <GradientStop Color="Tomato" Offset="0"/>
                    <GradientStop Color="Red" Offset="0.5"/>
                    <GradientStop Color="Crimson" Offset="0.7"/>
                </LinearGradientBrush>
            </Path.Fill>
            <Path.Data>
                <CombinedGeometry
                    GeometryCombineMode="Union"
                    >
                    <CombinedGeometry.Geometry1>
                        <RectangleGeometry
                        Rect="0,40,100,20">
                            <RectangleGeometry.Transform>
                                <RotateTransform CenterX="50" CenterY="50" Angle="45"/>
                            </RectangleGeometry.Transform>
                        </RectangleGeometry>
                    </CombinedGeometry.Geometry1>
                    <CombinedGeometry.Geometry2>
                        <RectangleGeometry
                        Rect="0,40,100,20"
                        >
                            <RectangleGeometry.Transform>
                                <RotateTransform CenterX="50" CenterY="50" Angle="135"/>
                            </RectangleGeometry.Transform>
                        </RectangleGeometry>
                    </CombinedGeometry.Geometry2>
                </CombinedGeometry>
            </Path.Data>
        </Path>
    </Canvas>
</UserControl>
ポイント
・CombinedGeometryで同じ大きさの二つの長方形を合成
・GeometryCombineModeはUnionで双方の領域を描画
・RenderTransformを使って長方形を45度、135度回転
・回転の中心はキャンバスの中心
WPF PathFigureによる描画
直線 - LineSegment
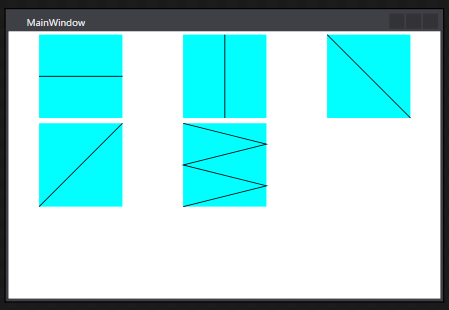
指定座標までの直線を引く。
<Window x:Class="WpfApp1.MainWindow"
        xmlns="http://schemas.microsoft.com/winfx/2006/xaml/presentation"
        xmlns:x="http://schemas.microsoft.com/winfx/2006/xaml"
        xmlns:d="http://schemas.microsoft.com/expression/blend/2008"
        xmlns:mc="http://schemas.openxmlformats.org/markup-compatibility/2006"
        xmlns:local="clr-namespace:WpfApp1"
        mc:Ignorable="d"
        Title="MainWindow" Height="350" Width="525">
    <UniformGrid>
        <Canvas Width="100" Height="100" Background="Aqua">
            <Path Stroke="Black">
                <Path.Data>
                    <PathGeometry>
                        <PathFigure StartPoint="0,50">
                            <LineSegment Point="100,50"/>
                        </PathFigure>
                    </PathGeometry>
                </Path.Data>
            </Path>
        </Canvas>
        <Canvas Width="100" Height="100" Background="Aqua">
            <Path Stroke="Black">
                <Path.Data>
                    <PathGeometry>
                        <PathFigure StartPoint="50,0">
                            <LineSegment Point="50,100"/>
                        </PathFigure>
                    </PathGeometry>
                </Path.Data>
            </Path>
        </Canvas>
        <Canvas Width="100" Height="100" Background="Aqua">
            <Path Stroke="Black">
                <Path.Data>
                    <PathGeometry>
                        <PathFigure StartPoint="0,0">
                            <LineSegment Point="100,100"/>
                        </PathFigure>
                    </PathGeometry>
                </Path.Data>
            </Path>
        </Canvas>
        <Canvas Width="100" Height="100" Background="Aqua">
            <Path Stroke="Black">
                <Path.Data>
                    <PathGeometry>
                        <PathFigure StartPoint="0,100">
                            <LineSegment Point="100,0"/>
                        </PathFigure>
                    </PathGeometry>
                </Path.Data>
            </Path>
        </Canvas>
        <Canvas Width="100" Height="100" Background="Aqua">
            <Path Stroke="Black">
                <Path.Data>
                    <PathGeometry>
                        <PathFigure StartPoint="0,0">
                            <LineSegment Point="100,25"/>
                            <LineSegment Point="0,50"/>
                            <LineSegment Point="100,75"/>
                            <LineSegment Point="0,100"/>
                        </PathFigure>
                    </PathGeometry>
                </Path.Data>
            </Path>
        </Canvas>
    </UniformGrid>
</Window>
円弧 - ArcSegment
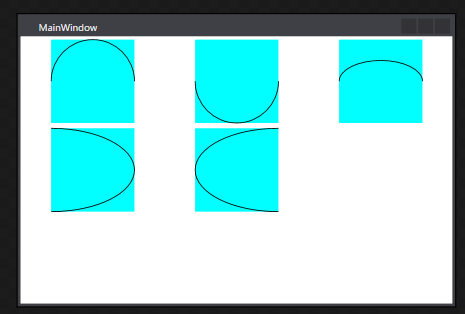
終点、X軸Y軸の半径、時計周りか半時計周りか
<Window x:Class="WpfApp1.MainWindow"
        xmlns="http://schemas.microsoft.com/winfx/2006/xaml/presentation"
        xmlns:x="http://schemas.microsoft.com/winfx/2006/xaml"
        xmlns:d="http://schemas.microsoft.com/expression/blend/2008"
        xmlns:mc="http://schemas.openxmlformats.org/markup-compatibility/2006"
        xmlns:local="clr-namespace:WpfApp1"
        mc:Ignorable="d"
        Title="MainWindow" Height="350" Width="525">
    <UniformGrid>
        <Canvas Width="100" Height="100" Background="Aqua">
            <Path Stroke="Black">
                <Path.Data>
                    <PathGeometry>
                        <PathFigure StartPoint="0,50">
                            <ArcSegment
                                Point="100,50"
                                Size="1,1"
                                SweepDirection="Clockwise"
                                />
                        </PathFigure>
                    </PathGeometry>
                </Path.Data>
            </Path>
        </Canvas>
        <Canvas Width="100" Height="100" Background="Aqua">
            <Path Stroke="Black">
                <Path.Data>
                    <PathGeometry>
                        <PathFigure StartPoint="0,50">
                            <ArcSegment
                                Point="100,50"
                                Size="1,1"
                                SweepDirection="Counterclockwise"
                                />
                        </PathFigure>
                    </PathGeometry>
                </Path.Data>
            </Path>
        </Canvas>
        <Canvas Width="100" Height="100" Background="Aqua">
            <Path Stroke="Black">
                <Path.Data>
                    <PathGeometry>
                        <PathFigure StartPoint="0,50">
                            <ArcSegment
                                Point="100,50"
                                Size="1,0.5"
                                IsLargeArc="False"
                                SweepDirection="Clockwise"
                                />
                        </PathFigure>
                    </PathGeometry>
                </Path.Data>
            </Path>
        </Canvas>
        <Canvas Width="100" Height="100" Background="Aqua">
            <Path Stroke="Black">
                <Path.Data>
                    <PathGeometry>
                        <PathFigure StartPoint="0,0">
                            <ArcSegment
                                Point="0,100"
                                Size="1,0.5"
                                IsLargeArc="False"
                                SweepDirection="Clockwise"
                                />
                        </PathFigure>
                    </PathGeometry>
                </Path.Data>
            </Path>
        </Canvas>
        <Canvas Width="100" Height="100" Background="Aqua">
            <Path Stroke="Black">
                <Path.Data>
                    <PathGeometry>
                        <PathFigure StartPoint="100,0">
                            <ArcSegment
                                Point="100,100"
                                Size="1,0.5"
                                IsLargeArc="False"
                                SweepDirection="Counterclockwise"
                                />
                        </PathFigure>
                    </PathGeometry>
                </Path.Data>
            </Path>
        </Canvas>
    </UniformGrid>
</Window>
2次ペジェ曲線 - QuadraticBezierSegment
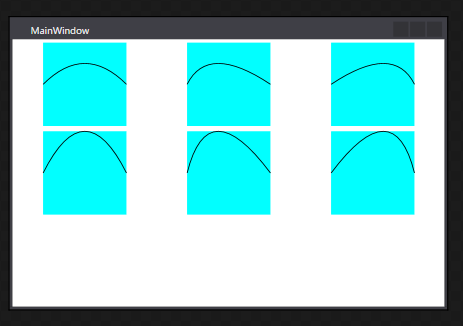
Point1は制御点、Point2が終点
<Window x:Class="WpfApp1.MainWindow"
        xmlns="http://schemas.microsoft.com/winfx/2006/xaml/presentation"
        xmlns:x="http://schemas.microsoft.com/winfx/2006/xaml"
        xmlns:d="http://schemas.microsoft.com/expression/blend/2008"
        xmlns:mc="http://schemas.openxmlformats.org/markup-compatibility/2006"
        xmlns:local="clr-namespace:WpfApp1"
        mc:Ignorable="d"
        Title="MainWindow" Height="350" Width="525">
    <UniformGrid>
        <Canvas Width="100" Height="100" Background="Aqua">
            <Path Stroke="Black">
                <Path.Data>
                    <PathGeometry>
                        <PathFigure StartPoint="0,50">
                            <QuadraticBezierSegment
                                Point1="50,0"
                                Point2="100,50"
                                />
                        </PathFigure>
                    </PathGeometry>
                </Path.Data>
            </Path>
        </Canvas>
        <Canvas Width="100" Height="100" Background="Aqua">
            <Path Stroke="Black">
                <Path.Data>
                    <PathGeometry>
                        <PathFigure StartPoint="0,50">
                            <QuadraticBezierSegment
                                Point1="25,0"
                                Point2="100,50"
                                />
                        </PathFigure>
                    </PathGeometry>
                </Path.Data>
            </Path>
        </Canvas>
        <Canvas Width="100" Height="100" Background="Aqua">
            <Path Stroke="Black">
                <Path.Data>
                    <PathGeometry>
                        <PathFigure StartPoint="0,50">
                            <QuadraticBezierSegment
                                Point1="75,0"
                                Point2="100,50"
                                />
                        </PathFigure>
                    </PathGeometry>
                </Path.Data>
            </Path>
        </Canvas>
        <Canvas Width="100" Height="100" Background="Aqua">
            <Path Stroke="Black">
                <Path.Data>
                    <PathGeometry>
                        <PathFigure StartPoint="0,50">
                            <QuadraticBezierSegment
                                Point1="50,-50"
                                Point2="100,50"
                                />
                        </PathFigure>
                    </PathGeometry>
                </Path.Data>
            </Path>
        </Canvas>
        <Canvas Width="100" Height="100" Background="Aqua">
            <Path Stroke="Black">
                <Path.Data>
                    <PathGeometry>
                        <PathFigure StartPoint="0,50">
                            <QuadraticBezierSegment
                                Point1="25,-50"
                                Point2="100,50"
                                />
                        </PathFigure>
                    </PathGeometry>
                </Path.Data>
            </Path>
        </Canvas>
        <Canvas Width="100" Height="100" Background="Aqua">
            <Path Stroke="Black">
                <Path.Data>
                    <PathGeometry>
                        <PathFigure StartPoint="0,50">
                            <QuadraticBezierSegment
                                Point1="75,-50"
                                Point2="100,50"
                                />
                        </PathFigure>
                    </PathGeometry>
                </Path.Data>
            </Path>
        </Canvas>
    </UniformGrid>
</Window>
3次ペジェ曲線 - BezierSegment
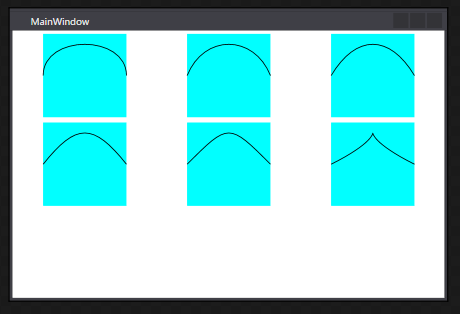
Point1、Point2が制御点、Point3が終点
<Window x:Class="WpfApp1.MainWindow"
        xmlns="http://schemas.microsoft.com/winfx/2006/xaml/presentation"
        xmlns:x="http://schemas.microsoft.com/winfx/2006/xaml"
        xmlns:d="http://schemas.microsoft.com/expression/blend/2008"
        xmlns:mc="http://schemas.openxmlformats.org/markup-compatibility/2006"
        xmlns:local="clr-namespace:WpfApp1"
        mc:Ignorable="d"
        Title="MainWindow" Height="350" Width="525">
    <UniformGrid>
        <Canvas Width="100" Height="100" Background="Aqua">
            <Path Stroke="Black">
                <Path.Data>
                    <PathGeometry>
                        <PathFigure StartPoint="0,50">
                            <BezierSegment
                                Point1="0,0"
                                Point2="100,0"
                                Point3="100,50"
                                />
                        </PathFigure>
                    </PathGeometry>
                </Path.Data>
            </Path>
        </Canvas>
        <Canvas Width="100" Height="100" Background="Aqua">
            <Path Stroke="Black">
                <Path.Data>
                    <PathGeometry>
                        <PathFigure StartPoint="0,50">
                            <BezierSegment
                                Point1="20,0"
                                Point2="80,0"
                                Point3="100,50"
                                />
                        </PathFigure>
                    </PathGeometry>
                </Path.Data>
            </Path>
        </Canvas>
        <Canvas Width="100" Height="100" Background="Aqua">
            <Path Stroke="Black">
                <Path.Data>
                    <PathGeometry>
                        <PathFigure StartPoint="0,50">
                            <BezierSegment
                                Point1="30,0"
                                Point2="70,0"
                                Point3="100,50"
                                />
                        </PathFigure>
                    </PathGeometry>
                </Path.Data>
            </Path>
        </Canvas>
        <Canvas Width="100" Height="100" Background="Aqua">
            <Path Stroke="Black">
                <Path.Data>
                    <PathGeometry>
                        <PathFigure StartPoint="0,50">
                            <BezierSegment
                                Point1="40,0"
                                Point2="60,0"
                                Point3="100,50"
                                />
                        </PathFigure>
                    </PathGeometry>
                </Path.Data>
            </Path>
        </Canvas>
        <Canvas Width="100" Height="100" Background="Aqua">
            <Path Stroke="Black">
                <Path.Data>
                    <PathGeometry>
                        <PathFigure StartPoint="0,50">
                            <BezierSegment
                                Point1="50,0"
                                Point2="50,0"
                                Point3="100,50"
                                />
                        </PathFigure>
                    </PathGeometry>
                </Path.Data>
            </Path>
        </Canvas>
        <Canvas Width="100" Height="100" Background="Aqua">
            <Path Stroke="Black">
                <Path.Data>
                    <PathGeometry>
                        <PathFigure StartPoint="0,50">
                            <BezierSegment
                                Point1="100,0"
                                Point2="0,0"
                                Point3="100,50"
                                />
                        </PathFigure>
                    </PathGeometry>
                </Path.Data>
            </Path>
        </Canvas>
    </UniformGrid>
</Window>
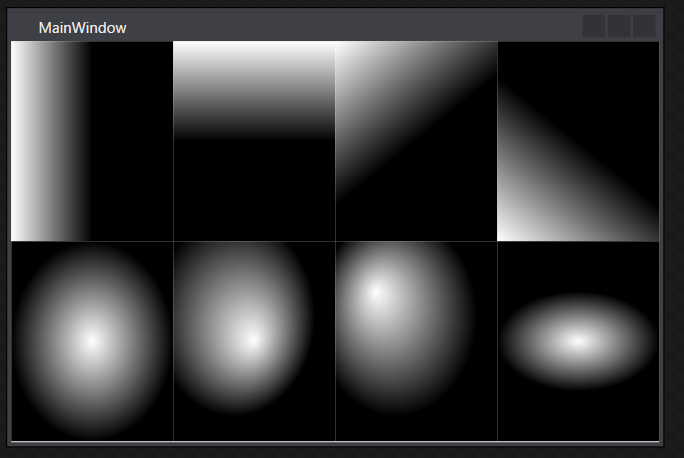
WPFのグラデーション
一つ前の記事と同じようにグラデーションについてもメモ
<Window x:Class="WpfApp1.MainWindow"
        xmlns="http://schemas.microsoft.com/winfx/2006/xaml/presentation"
        xmlns:x="http://schemas.microsoft.com/winfx/2006/xaml"
        xmlns:d="http://schemas.microsoft.com/expression/blend/2008"
        xmlns:mc="http://schemas.openxmlformats.org/markup-compatibility/2006"
        xmlns:local="clr-namespace:WpfApp1"
        mc:Ignorable="d"
        Title="MainWindow" Height="350" Width="525">
    <UniformGrid
        Rows="2"
        Columns="4"
        >
        <Canvas>
            <Canvas.Background>
                <LinearGradientBrush StartPoint="0,1" EndPoint="1,1">
                    <GradientStop Color="White" Offset="0"/>
                    <GradientStop Color="Black" Offset="0.5"/>
                </LinearGradientBrush>
            </Canvas.Background>
        </Canvas>
        <Canvas>
            <Canvas.Background>
                <LinearGradientBrush StartPoint="0,0" EndPoint="0,1">
                    <GradientStop Color="White" Offset="0"/>
                    <GradientStop Color="Black" Offset="0.5"/>
                </LinearGradientBrush>
            </Canvas.Background>
        </Canvas>
        <Canvas>
            <Canvas.Background>
                <LinearGradientBrush StartPoint="0,0" EndPoint="1,1">
                    <GradientStop Color="White" Offset="0"/>
                    <GradientStop Color="Black" Offset="0.5"/>
                </LinearGradientBrush>
            </Canvas.Background>
        </Canvas>
        <Canvas>
            <Canvas.Background>
                <LinearGradientBrush StartPoint="0,1" EndPoint="1,0">
                    <GradientStop Color="White" Offset="0"/>
                    <GradientStop Color="Black" Offset="0.5"/>
                </LinearGradientBrush>
            </Canvas.Background>
        </Canvas>
        <Canvas>
            <Canvas.Background>
                <RadialGradientBrush RadiusX="1" RadiusY="1" Center="0.5,0.5" GradientOrigin="0.5,0.5">
                    <GradientStop Color="White" Offset="0"/>
                    <GradientStop Color="Black" Offset="0.5"/>
                </RadialGradientBrush>
            </Canvas.Background>
        </Canvas>
        <Canvas>
            <Canvas.Background>
                <RadialGradientBrush RadiusX="1" RadiusY="1" Center="0.25,0.25" GradientOrigin="0.5,0.5">
                    <GradientStop Color="White" Offset="0"/>
                    <GradientStop Color="Black" Offset="0.5"/>
                </RadialGradientBrush>
            </Canvas.Background>
        </Canvas>
        <Canvas>
            <Canvas.Background>
                <RadialGradientBrush RadiusX="1" RadiusY="1" Center="0.5,0.5" GradientOrigin="0.25,0.25">
                    <GradientStop Color="White" Offset="0"/>
                    <GradientStop Color="Black" Offset="0.5"/>
                </RadialGradientBrush>
            </Canvas.Background>
        </Canvas>
        <Canvas>
            <Canvas.Background>
                <RadialGradientBrush RadiusX="1" RadiusY="0.5" Center="0.5,0.5" GradientOrigin="0.5,0.5">
                    <GradientStop Color="White" Offset="0"/>
                    <GradientStop Color="Black" Offset="0.5"/>
                </RadialGradientBrush>
            </Canvas.Background>
        </Canvas>
    </UniformGrid>
</Window>
WPFの描画関係メモ
描画関係、仕事では滅多に使わないのだけど、
その分毎回忘れてしまうのでこの記事でメモ
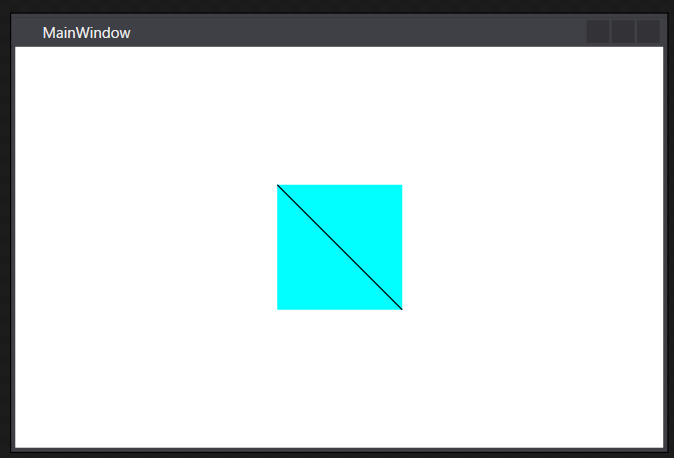
とにかく線を引いてみる
Lineクラスをそのまま使うことも出来るけど、
多少込み入った描画方法も習得したいならPathを覚えた方が良さそう。
(その分重いみたいだが・・・)
<Window x:Class="WpfApp1.MainWindow"
        xmlns="http://schemas.microsoft.com/winfx/2006/xaml/presentation"
        xmlns:x="http://schemas.microsoft.com/winfx/2006/xaml"
        xmlns:d="http://schemas.microsoft.com/expression/blend/2008"
        xmlns:mc="http://schemas.openxmlformats.org/markup-compatibility/2006"
        xmlns:local="clr-namespace:WpfApp1"
        mc:Ignorable="d"
        Title="MainWindow" Height="350" Width="525">
    <Canvas
        Height="100"
        Width="100"
        Background="Aqua"
        >
        <Path
            Stroke="Black"
            >
            <Path.Data>
                <LineGeometry
                    StartPoint="0,0"
                    EndPoint="100,100"
                    />
            </Path.Data>
        </Path>
    </Canvas>
</Window>
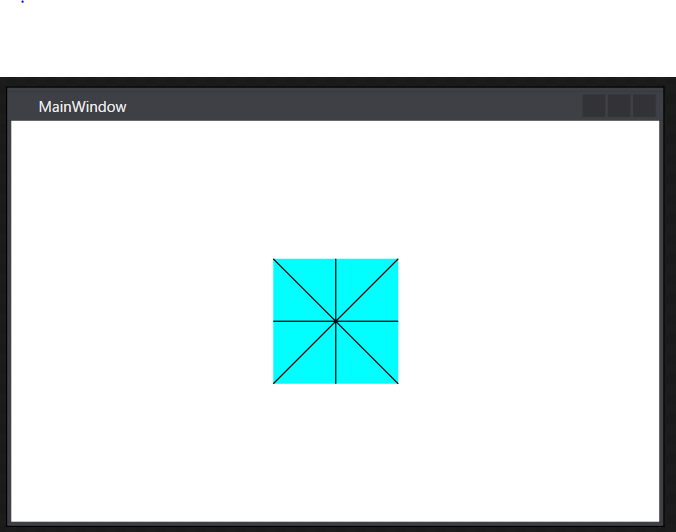
複数の線を引く
GeometryGroupの中に描画したいGeometryを追加して行けば良い。
<Window x:Class="WpfApp1.MainWindow"
        xmlns="http://schemas.microsoft.com/winfx/2006/xaml/presentation"
        xmlns:x="http://schemas.microsoft.com/winfx/2006/xaml"
        xmlns:d="http://schemas.microsoft.com/expression/blend/2008"
        xmlns:mc="http://schemas.openxmlformats.org/markup-compatibility/2006"
        xmlns:local="clr-namespace:WpfApp1"
        mc:Ignorable="d"
        Title="MainWindow" Height="350" Width="525">
    <Canvas
        Height="100"
        Width="100"
        Background="Aqua"
        >
        <Path
            Stroke="Black"
            >
            <Path.Data>
                <GeometryGroup>
                    <LineGeometry
                        StartPoint="0,0"
                        EndPoint="100,100"
                        />
                    <LineGeometry
                        StartPoint="100,0"
                        EndPoint="0,100"
                        />
                    <LineGeometry
                        StartPoint="50,0"
                        EndPoint="50,100"
                        />
                    <LineGeometry
                        StartPoint="0,50"
                        EndPoint="100,50"
                        />
                </GeometryGroup>
            </Path.Data>
        </Path>
    </Canvas>
</Window>
円・楕円
円、楕円は中心の座標とX軸の半径、Y軸の半径を指定する。
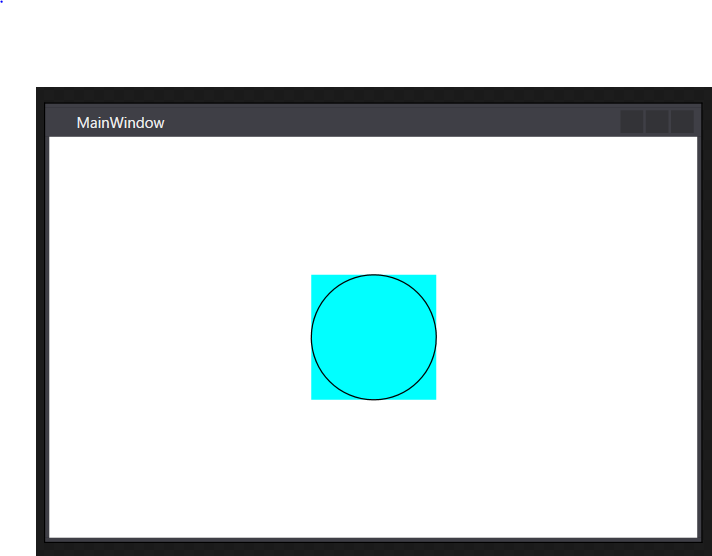
<Window x:Class="WpfApp1.MainWindow"
        xmlns="http://schemas.microsoft.com/winfx/2006/xaml/presentation"
        xmlns:x="http://schemas.microsoft.com/winfx/2006/xaml"
        xmlns:d="http://schemas.microsoft.com/expression/blend/2008"
        xmlns:mc="http://schemas.openxmlformats.org/markup-compatibility/2006"
        xmlns:local="clr-namespace:WpfApp1"
        mc:Ignorable="d"
        Title="MainWindow" Height="350" Width="525">
    <Canvas
        Height="100"
        Width="100"
        Background="Aqua"
        >
        <Path
            Stroke="Black"
            >
            <Path.Data>
                <EllipseGeometry
                    Center="50,50"
                    RadiusX="50"
                    RadiusY="50"
                    />
            </Path.Data>
        </Path>
    </Canvas>
</Window>
四角形
四角形はRectプロパティにX軸の始点、Y軸の始点、X軸の幅、Y軸の幅を指定する。

<Window x:Class="WpfApp1.MainWindow"
        xmlns="http://schemas.microsoft.com/winfx/2006/xaml/presentation"
        xmlns:x="http://schemas.microsoft.com/winfx/2006/xaml"
        xmlns:d="http://schemas.microsoft.com/expression/blend/2008"
        xmlns:mc="http://schemas.openxmlformats.org/markup-compatibility/2006"
        xmlns:local="clr-namespace:WpfApp1"
        mc:Ignorable="d"
        Title="MainWindow" Height="350" Width="525">
    <Canvas
        Height="100"
        Width="100"
        Background="Aqua"
        >
        <Path
            Stroke="Black"
            >
            <Path.Data>
                <RectangleGeometry
                    Rect="20,20,60,60"
                    />
            </Path.Data>
        </Path>
    </Canvas>
</Window>
塗りつぶし
PathクラスのFillプロパティにブラシを指定することで塗りつぶし
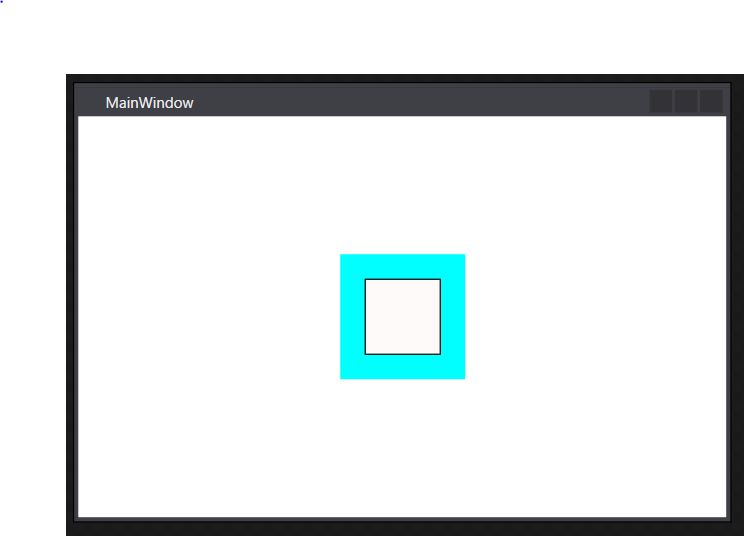
<Window x:Class="WpfApp1.MainWindow"
        xmlns="http://schemas.microsoft.com/winfx/2006/xaml/presentation"
        xmlns:x="http://schemas.microsoft.com/winfx/2006/xaml"
        xmlns:d="http://schemas.microsoft.com/expression/blend/2008"
        xmlns:mc="http://schemas.openxmlformats.org/markup-compatibility/2006"
        xmlns:local="clr-namespace:WpfApp1"
        mc:Ignorable="d"
        Title="MainWindow" Height="350" Width="525">
    <Canvas
        Height="100"
        Width="100"
        Background="Aqua"
        >
        <Path
            Stroke="Black"
            Fill="Snow"
            >
            <Path.Data>
                <RectangleGeometry
                    Rect="20,20,60,60"
                    />
            </Path.Data>
        </Path>
    </Canvas>
</Window>
交差部分の塗りつぶし
GeometryGroupのFillRuleプロパティによって交差する図形の描画方法が変わる。
GeometryGroup.FillRule プロパティ (System.Windows.Media)
↑ぱっと読んだだけでは理解出来ず・・・
EvenOdd⇒交差する部分を塗りつぶししない?
NonZero⇒交差する部分を塗りつぶす?
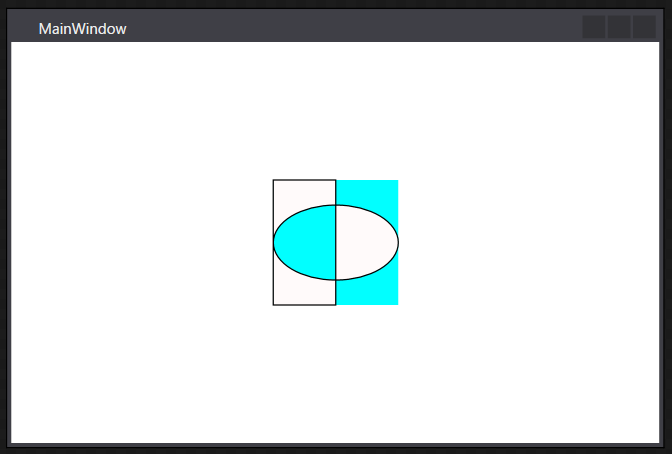
<Window x:Class="WpfApp1.MainWindow"
        xmlns="http://schemas.microsoft.com/winfx/2006/xaml/presentation"
        xmlns:x="http://schemas.microsoft.com/winfx/2006/xaml"
        xmlns:d="http://schemas.microsoft.com/expression/blend/2008"
        xmlns:mc="http://schemas.openxmlformats.org/markup-compatibility/2006"
        xmlns:local="clr-namespace:WpfApp1"
        mc:Ignorable="d"
        Title="MainWindow" Height="350" Width="525">
    <Canvas
        Height="100"
        Width="100"
        Background="Aqua"
        >
        <Path
            Stroke="Black"
            Fill="Snow"
            >
            <Path.Data>
                <GeometryGroup FillRule="EvenOdd">
                    <RectangleGeometry
                        Rect="0,0,50,100"
                        />
                    <EllipseGeometry
                        Center="50,50"
                        RadiusX="50"
                        RadiusY="30"
                        />
                </GeometryGroup>
            </Path.Data>
        </Path>
    </Canvas>
</Window>
交差部分の塗りつぶし(CombinedGeometry)
CombinedGeometryを使うと交差部分の扱いがもう少し理解しやすい。
WPFでプログラムしてみよう(6) - 子持ちししゃもといっしょ
参考にさせていただくと、
CombinedGeometryはGeometry1とGeometry2の二つの要素の合成であり、
GeometryCombineModeで交差部分の処理を切り替えることが出来る様子。
Exclude⇒Geometry1からGeometry2の交差部分を除いた領域を描画
Intersect⇒交差部分のみ描画
Union⇒全ての領域を描画
Xor⇒交差部分以外を描画
さっきと同じ結果だが、CombinedGeometryで書き換えると以下のようになる

<Window x:Class="WpfApp1.MainWindow"
        xmlns="http://schemas.microsoft.com/winfx/2006/xaml/presentation"
        xmlns:x="http://schemas.microsoft.com/winfx/2006/xaml"
        xmlns:d="http://schemas.microsoft.com/expression/blend/2008"
        xmlns:mc="http://schemas.openxmlformats.org/markup-compatibility/2006"
        xmlns:local="clr-namespace:WpfApp1"
        mc:Ignorable="d"
        Title="MainWindow" Height="350" Width="525">
    <Canvas
        Height="100"
        Width="100"
        Background="Aqua"
        >
        <Path
            Stroke="Black"
            Fill="Snow"
            >
            <Path.Data>
                <CombinedGeometry
                    GeometryCombineMode="Xor"
                    >
                    <CombinedGeometry.Geometry1>
                        <RectangleGeometry
                            Rect="0,0,50,100"
                            />
                    </CombinedGeometry.Geometry1>
                    <CombinedGeometry.Geometry2>
                        <EllipseGeometry
                            Center="50,50"
                            RadiusX="50"
                            RadiusY="30"
                            />
                    </CombinedGeometry.Geometry2>
                </CombinedGeometry>
            </Path.Data>
        </Path>
    </Canvas>
</Window>
C# WPF PreviewTextInputで入力後のテキストを取得する。
とりあえずコード
        private static void TextBox_PreviewTextInput(object sender, TextCompositionEventArgs e)
        {
            var textBox = sender as TextBox;
            if (textBox == null) return;

            var changed =
                textBox.Text
                .Remove(textBox.SelectionStart, textBox.SelectionLength)
                .Insert(textBox.SelectionStart, e.Text)
                ;
        }
・テキストボックスの選択範囲の文字列を消す。(Removeメソッドの部分)
・イベント引数から入力された文字列(e.Text)を選択位置に挿入する。(Insertメソッドの部分)
※自作ビヘイビアからの抜粋なのでメソッドはprivate static
注意しなければいけないこと
これだけで万事解決出来れば良いのだけど他にも気を付けなければいけないことある。
ペーストへの対応
DataObjectPastingイベントのハンドラーを使ってペースト時にチェックを処理を差し込んでやる必要がある。
イベントハンドラーの購読はDataObjectクラスのAddPastingHandlerメソッド、
購読の解除はDataObjectクラスのRemovePastingHandlerメソッドを使う。
DataObjectPastingイベントの購読と購読解除の例
            // 購読開始
            DataObject.AddPastingHandler(textBox, OnPasting);
            // 購読解除
            DataObject.RemovePastingHandler(textBox, OnPasting);
先のPreviewTextInputの時と同じようにペーストした後のテキストを取得するなら以下のような具合になる。
        private static void DataObject_Pasting(object sender, DataObjectPastingEventArgs e)
        {
            var textBox = sender as TextBox;
            if (textBox == null) return;

            var pasted = e.SourceDataObject.GetData(DataFormats.UnicodeText) as string;
            if (pasted == null) return;

            var changed =
                textBox.Text
                .Remove(textBox.SelectionStart, textBox.SelectionLength)
                .Insert(textBox.SelectionStart, pasted)
                ;
        }
IMEへの対応
WPFではIMEの入力途中であってもTextChangedイベントが発生する。半角文字の入力に限定したコントロールであれば、
フォーカス中にIMEを無効化すれば良いが、全角入力を受け付ける場合は注意が必要。
Textプロパティへの書き込み
コード側でTextBoxのTextプロパティを書き換えられた場合、これはTextChangedイベントで検出する必要がある。全てのチェックをTextChangedイベントで完結させることも出来るが、キャレットの復元やテキストの復元まで考慮すると複雑なロジックになってしまいがち。また、MVVMで開発している場合、ViewModelとの余計な通信が発生する原因にもなるので役割を分担して対応したいところ。